Most Drupal installations are using Mysql / MariaDB or Postgres for their data storage which allows Drupal to offer versatile and flexible ways of modeling content, especially building relationships with different content model, i.e. a blog post and a vocabulary with tags. In this blog post I will show you how to use Redis with Drupal for other things besides caching.
Image

In Drupal projects, it is common to use the same database for caching and other key/value data, but larger projects usually utilize in-memory databases like Memcache or Redis to store this kind of data. This helps reduce the file size of the application database and improves the speed of reading and writing data for caching.
Since Redis is a NoSQL database application, it can be used for more than just caching. It offers a simple key-value store but also has a variety of data structures like strings, hashes, lists, and many more. This is combined with performance and speed by storing data in memory, offering various levels of persistence. The Pub/Sub messaging system is another great feature, particularly handy for implementing real-time messaging applications.
Monitoring devices within Drupal
For #MyCardSorter, I am building a Drupal installation that will act as a central hub where all devices must register and receive commands. This post will describe how I will monitor the uptime of the devices by handling heartbeat signals.
What is a heartbeat signal?
Heartbeat signals are lightweight signals often used in monitoring distributed systems. Depending on the project, they can help detect errors early, replace faulty systems, and serve many other use cases.
In my use case, I want all my devices to ping a certain endpoint so my Drupal instance knows the devices are online and can reach the instance. The data to store is not complex; it will receive a "status" value which gets stored along with the timestamp of the signal.
Now, I could store this data in the Drupal database, but there are several points to consider:
- I don't know how many devices will eventually send a heartbeat.
- Each device will send at least one signal every minute.
- I don't need a long history of the data retained.
In my mind off-loading this data to Redis is a good way of scaling this later down the line.
Setting up Redis
Redis can either be self-hosted or rented. For this example, I will simply use the DDEV package, which is really simple to set up:
ddev get ddev/ddev-redis
This command will create a new service and also update the settings files.
Next up is installing the Redis module for Drupal:
composer require 'drupal/redis:^1.7'
After enabling the module, you should already be good to go; Drupal will store its cache in the Redis database.
You can check this by opening the redis-cli:
lucio@pop-os> ddev redis-cli
redis:6379> KEYS *
  1) "drupal.redis.10.0.9..1b1d36866cd3838283aff4aa23abebfdebf122e1b8ce37e991cfd42e9aee7e8a:default:twig:65674054c9edd_page-title.html.twig_C-aI28H1wCRg97iJeFau2jScU"
...
Example Project: Heartbeat Signal Monitoring
After ensuring my Drupal instance can write to and read from the Redis database, I created a new module, "Device Manager," which will:
- Provide a custom "Device" content entity with permissions, routing, and a list builder.
- Offer a service for handling the heartbeat signals, including routes, etc.
- Include a service for managing the device registry.
I will focus this section on the parts relevant to the heartbeat signal. If you feel like you are missing information to understand this part, please feel free to write a comment under this blog post!
The device entity type
I chose to create a custom fieldable entity type because I am uncertain what data I will need later in my project and figured it would be the best approach moving forward. For now, I have a very basic content entity, with one exception: I knew I would need a custom device registry to quickly look up devices from the cache when needed (i.e., checking if a heartbeat is associated with a device).
In my Device class, I modified the save() and delete() functions to create, update, or delete entries from this registry
Note: Most of this code is actually in my DeviceManagerRegistry service, but I added it here for simplicity.
public function save() {
    parent::save();
    // Add device to cache.
    $cache_backend = \Drupal::service('cache.default');
    $cached_devices = $cache_backend->get('devices');
    // Update cache.
    if (is_object($cached_devices) && !is_null($cached_devices->data)) {
      $cached_devices->data[$this->uuid()] = $this->id();
      $cache_backend->set('devices', $cached_devices->data);
    }
    // Create new cache.
    else {
      $cache_backend->set('devices', [$this->uuid() => $this->id()]);
    }
  }
  ..
  public function delete() {
    // Remove device from cache.
    $cache_backend = \Drupal::service('cache.default');
    $cached_devices = $cache_backend->get('devices');
    if (!is_null($cached_devices) && count($cached_devices->data) > 0 && isset($cached_devices->data[$this->uuid()])) {
      unset($cached_devices->data[$this->uuid()]);
    }
    $cache_backend->set('devices', $cached_devices->data);
    parent::delete();
  }
Now, with my devices cached, I created a new Controller that will receive the signal. You will notice I use the UUID of the content entity to identify the device. This UUID will be used by the machines later to send the signal for themselves.
Creating the Heartbeat Controller
I wanted to have an endpoint reachable where the UUID would be passed as a parameter:
device_manager.heartbeat:
  path: '/device/heartbeat/{hash_id}'
  defaults:
    _controller: '\Drupal\device_manager\Controller\HeartbeatController::heartbeat'
    _title: 'Handle Device Heartbeat'
  requirements:
    _permission: 'can send heartbeat'
  options:
    parameters:
      hash_id:
        type: string
The controller is straightforward. We receive the data and pass it to a service, which will handle the task of saving the data to the Redis service.
/**
   * Heartbeat endpoint for devices to check in.
   *
   * @param \Symfony\Component\HttpFoundation\Request $request
   *
   * @return \Symfony\Component\HttpFoundation\JsonResponse
   */
  public function heartbeat($hash_id, Request $request) {
    $data = json_decode($request->getContent(), TRUE);
    $heartbeat_data = [
      'uuid' => $hash_id,
      'time' => time(),
      'status' => $data['status'],
    ];
    $heartbeat_result = $this->heartbeatService->saveDeviceHeartbeat($heartbeat_data);

    if ($heartbeat_result) {
      return new JsonResponse(['message' => 'Heartbeat recieved'], 200);
    }
    else {
      return new JsonResponse(['message' => 'Device not found.', 404]);
    }
  }
The HeartbeatService uses the client factory service from the redis module to talk to the redis instance:
public function __construct(ClientFactory $clientFactory, CacheBackendInterface $cacheBackend, DeviceManagerRegistryInterface $deviceRegistry) {
    $this->clientFactory = $clientFactory;
    $this->cacheBackend = $cacheBackend;
    $this->deviceRegistry = $deviceRegistry;
    $this->redisClient = $this->clientFactory->getClient();
  }

  public static function create(ContainerInterface $container) {
    return new static(
      $container->get('redis.factory'),
      $container->get('cache.default'),
      $container->get('device_manager.registry'),
    );

  }
With this service it is really easy to write new data. We are using a Redis pipeline to send the relevant data:
 public function saveDeviceHeartbeat(array $heartbeat_data): bool {
    // Set the lookup key.
    $key = "device:" . $heartbeat_data['uuid'];

    // Get devices and check if there is a hashed version of the device.
    $device = $this->deviceRegistry->lookupDeviceByHash($heartbeat_data['uuid']);

    // Update the heartbeat data, so we can also store the entity id.
    $heartbeat_data['device_id'] =  $device->id();

    //...

    // Create a new pipeline to queue storing our data.
    $pipe = $this->redisClient->pipeline();
    // We use the data type has for storing our data.
    $pipe->hSet($key, $heartbeat_data['time'], json_encode($heartbeat_data));
    // Cache the heartbeat data for 1 hour.
    $pipe->expire($key, 3600);
    $pipe->exec();
    // ...
    // More error handling
    return $result;
  }
Using a pipeline here is not really needed right now because we are not sending a lot of data here but it does not harm and we can extend this in the future if needed.
Sending the heartbeats
I created some test devices in my local Drupal instance and then crafted a custom Bash script to send data to the endpoint. I wanted two devices to stop sending signals after some time to ensure the system works correctly.
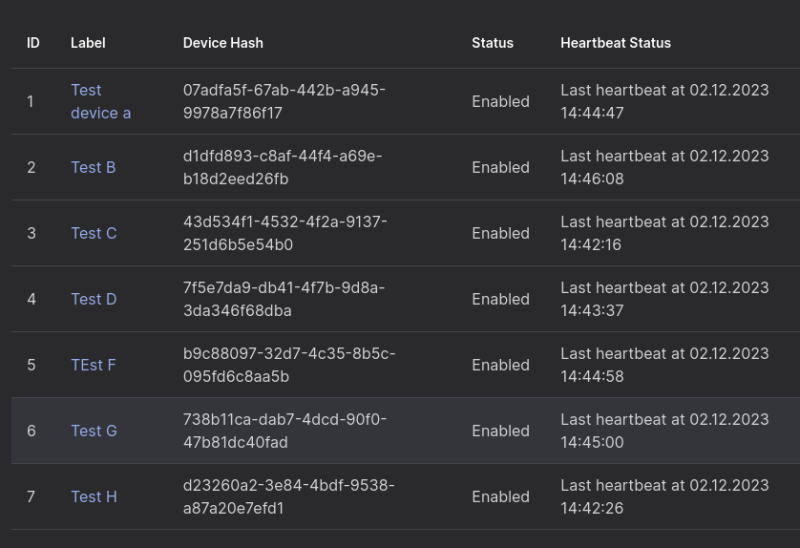
#!/bin/bash

# Array of device hash IDs.
declare -a devices=("07adfa5f-67ab-442b-a945-9978a7f86f17" "d1dfd893-c8af-44f4-a69e-b18d2eed26fb" "43d534f1-4532-4f2a-9137-251d6b5e54b0" "7f5e7da9-db41-4f7b-9d8a-3da346f68dba" "b9c88097-32d7-4c35-8b5c-095fd6c8aa5b" "738b11ca-dab7-4dcd-90f0-47b81dc40fad" "d23260a2-3e84-4bdf-9538-a87a20e7efd1")

# Base URL for the heartbeat endpoint.
base_url="https://MY_SITE/device/heartbeat"

# Number of tries after which two devices will stop sending heartbeats.
max_tries=5

# Counter for the number of tries.
count=0

while true; do
    for hash_id in "${devices[@]}"; do
        # Check if the device should still send heartbeats.
        if [ "$hash_id" != "738b11ca-dab7-4dcd-90f0-47b81dc40fad" ] && [ "$hash_id" != "d23260a2-3e84-4bdf-9538-a87a20e7efd1" ] || [ $count -lt $max_tries ]; then
            # Send a heartbeat request.
            curl -X POST "$base_url/$hash_id" -H "Content-Type: application/json" -d '{"data": "heartbeat data"}'
        fi
        sleep 2
    done

    # Increment the counter.
    ((count++))

    # Wait for one minute.
    sleep 60
done
Output:
lucio@pop-os> bash test_heartbeat.sh
{"message":"Heartbeat recieved"}{"message":"Heartbeat recieved"}{"message":"Heartbeat recieved"}...
Checking the Heartbeat signals
With the data sent I only had to extend my DeviceListBuilder to show me when the last heartbeat data has been recieved.
Inside DeviceListBuilder.php:
 public function buildHeader() {
   $header['id'] = $this->t('ID');
   ...
   $header['heartbeat_status'] = $this->t('Heartbeat Status');
   ...
   return $header + parent::buildHeader();
 }

 public function buildRow(EntityInterface $entity) {
    $heartbeat_service = \Drupal::service('device_manager.heartbeat');
    $last_heartbeat = $heartbeat_service->getLastDeviceHeartbeatByHashId($entity->uuid());
    /** @var \Drupal\device_manager\DeviceInterface $entity */
    $row['id'] = $entity->id();
    ...
    $row['heartbeat'] = $last_heartbeat ? $this->t('Last heartbeat at @time', ['@time' => date('d.m.Y H:i:s', $last_heartbeat['time'])]) : $this->t('No data');
    ...
    return $row + parent::buildRow($entity);
  }
And the lookup function:
public function getLastDeviceHeartbeatByHashId(string $hash_id): array|NULL {
    // Set the lookup key.
    $key = "device:" . $hash_id;

    // Get the data associated with the key from the redis storage.
    $data = $this->redisClient->hGetAll($key);
    $last_element = array_pop($data);
    if (is_string($last_element)) {
      $last_element_data = json_decode($last_element, TRUE);
      // Check for integrity
      //...
      return last_element_data;
    }
    else {
      return NULL;
    }
  }
Now the heartbeat data shows up in the list of devices. You could further improve this by choosing different icons for the time differences where the last heartbeat has been recieved but this is good for now:
Image
Conclusion
In summary, using Redis with Drupal for monitoring heartbeat signals from numerous devices is a highly efficient and scalable solution. Redis's in-memory data handling significantly enhances performance, ensuring rapid processing of high-frequency data while keeping the Drupal database optimized for its primary tasks. This combination demonstrates the versatility of Drupal, extending its capabilities beyond content management to effectively manage real-time, voluminous data. The integration of Redis, renowned for its speed and flexibility, with Drupal's robust architecture, illustrates an effective approach to complex, data-intensive applications in today's evolving technology landscape.
Comments