In this edition of the DevLog I will explain what I made as a first working prototype for MyCardSorter.
Image

In the previous DevLog, I tried two different versions of how to retrieve a card from a card stack. I went with the last version for the next step since it worked quite okay, although not perfect. The goal of the next step was to build the tray where the card would wait to get the picture taken and then would be released so that the next card could be scanned.
Note: This is part of a series of blog posts I am currently writing (Fall 2023), looking back, realizing that some details might be a bit fuzzy. I failed to document my progress from the beginning, but I wanted to do a write-up anyway.
Building the card tray
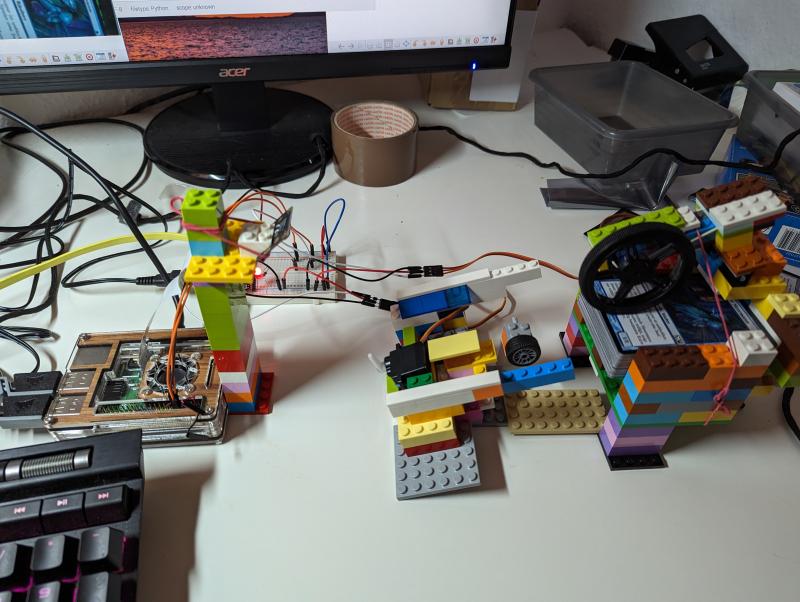
With the remaining Lego blocks I had in my inventory, I started building the tray which would hold the card until the picture was taken. The plan was to add the smaller motor from the test in the last blog post to the tray where the motor arm would be upright and block the card. After the picture has been taken, the arm would be tilted, and the card could slide down, and after a fixed time, the motor arm would return to the upright position.
I mounted the smaller motor to the tray and went ahead with testing right away. It took me some time to calibrate the distance of the tray to the card dispenser so that the card would not shoot over the tray, but after I managed to calibrate the distance and the dispenser, it worked quite well!
Video file
Taking a picture of the card
The only missing part of my first goal of taking pictures of all the cards was to actually take the picture now. With the dispenser and tray taking care of, I had to connect the PiCam to the Raspberry Pi and build a small stand for it. But before I started building the stand, I decided to make a new Python script for testing taking pictures.
from picamera import PiCamera
from dotenv import load_dotenv
from pathlib import Path
import os
import time
dotenv_path = Path('.env')
if dotenv_path.is_file():
   load_dotenv(dotenv_path=dotenv_path)
camera = PiCamera()
camera.zoom = (float(os.getenv('MTG_MACHINE_CAMERA_ZOOM_X')),float(os.getenv('MTG_MACHINE_CAMERA_ZOOM_Y')),float(os.getenv('MTG_MACHINE_CAMERA_ZOOM_W')),float(os.getenv('MTG_MACHINE_CAMERA_ZOOM_H')))
camera.rotation = int(os.getenv('MTG_MACHINE_CAMERA_ROTATION'))
timestamp = time.strftime("%Y%m%d%H%M%S")
camera.capture("samples/" + timestamp + ".jpg")
As you can see, I also fiddled around with the zoom and rotation function of the camera. This helped me calibrate the camera for the actual script since I only had to run a quick test first and add the best variable values for my setup.
Image
Here you can see the first setup with the camera. You will notice that the camera is not directly added to the rest of the Lego setup. I wasn't too happy with this as the pictures were often not good, and if you look closely, you can see why! The lighting was awful, and the angle was not perfect. I quickly changed the setup to the following:
Video file
This was really great progress, and I was very happy to have achieved this. But, of course, there were a lot of things on my mind while creating this solution. I was still not satisfied with the dispenser as it would only work for maybe 2/3 of the card stack, and I knew this solution would not really be practical as you cannot add cards without stopping the process. Since there would always be pressure on the card, I also was not happy with the idea of possibly damaging the cards.
Also, the time the motor would wait until it released a card was fixed as there was no way until then to know when and if a card actually was in the tray.
The code for this part:
from picamera import PiCamera
import RPi.GPIO as GPIO
from PIL import Image
import time
import sys

servoPin=4
miniServoPin=14
camera = PiCamera()

def cameraSetup(camera):

	camera.rotation = 90


def setup():
	GPIO.setwarnings(False)
	GPIO.setmode(GPIO.BCM)
	GPIO.setup(servoPin,GPIO.OUT)
	GPIO.setup(miniServoPin,GPIO.OUT)

def servoPush(push_time):
	print ("Push card")
	servo.ChangeDutyCycle(2.5)
	time.sleep(push_time)
	servo.ChangeDutyCycle(0)

def servoPull(pull_time):
	print ("Pull card")
	servo.ChangeDutyCycle(7.5)
	time.sleep(pull_time)
	servo.ChangeDutyCycle(0)

def fixCards():
	print ("Fix cards")
	servoPull(1)

def pushCard(card_count):
	servoPush(0.1)
	time.sleep(0.2)
	servoPush(0.1)
	time.sleep(0.2)
	servoPush(0.1)
	time.sleep(0.5)
	servoPush(0.1)
	time.sleep(0.5)

setup()
cameraSetup(camera)

# Assign motors from pins.
servo=GPIO.PWM(servoPin,50)
miniServo=GPIO.PWM(miniServoPin,50)

# Start motors.
miniServo.start(2.5)
servo.start(0)
servo.ChangeDutyCycle(0)
time.sleep(1)

# Set more defaults.
card_count = 0

try:
	while True:
		timestamp = time.strftime("%Y%m%d%H%M%S")
		card_count = card_count + 1
		print ("Handling card " + str(card_count))
		# Set small motor to block card in tray.
		print ("Set to 2.5")
		miniServo.ChangeDutyCycle(2.5)
		time.sleep(0.5)
		# Start the continous servo motor.
		servo.ChangeDutyCycle(0)
		# Push a card from the pile.
		pushCard(card_count)
		# Try fix the remaining pile by pulling and pushing.
		fixCards()
		# Take a picture
		camera.capture("test2/" + timestamp + ".jpg")
		time.sleep(1)
		print ("Set to 7.5")
		miniServo.ChangeDutyCycle(7.5)
		time.sleep(1)

except KeyboardInterrupt:
	p.stop()
	GPIO.cleanup()
In this edition of the DevLog for MyCardSorter, we delved into the exciting world of building the hardware and electronics for our DIY card sorter. We explored the journey of creating a card tray, perfect for holding cards in place as they awaited their turn to be scanned and sorted. The addition of a smaller motor to this tray served the crucial role of blocking and releasing the cards.
With the tray and motor in place, I embarked on the journey of capturing images of the cards. This marked a significant step towards achieving my goal. I dived into the calibration of the PiCam, adjusting zoom and rotation settings to ensure that I captured the cards with precision.
The images and videos shared in this blog post offered a glimpse into the progress I've made. However, this is just the beginning of the project. The road ahead promises both challenges and opportunities for improvement.
While I celebrated these achievements, a sense of determination accompanied me. I recognized that there is still work to be done. The card dispenser, while functional, has limitations, and the issue of card detection looms ahead. Yet, these challenges drive me forward, providing motivation to refine and enhance the project.
In the upcoming Part 2 of this DevLog series, I will unveil the reworked card dispenser, a significant improvement over the previous version. I will also introduce the concept of card detection, a development that promises to make the card sorting machine even more exciting and efficient.
I hope you continue to follow my journey in the development of MyCardSorter. Your support and interest inspire me to keep pushing the boundaries of what's possible in the world of DIY card sorting. Until next time, stay tuned for the next chapter in this adventure, and thank you for being a part of it!
Comments